Temple of Trials: Difference between revisions
From Elwiki
mNo edit summary |
Gameboy224 (talk | contribs) No edit summary |
||
| (5 intermediate revisions by 3 users not shown) | |||
| Line 16: | Line 16: | ||
<dfn>}}</dfn> | <dfn>}}</dfn> | ||
| Ally=<dfn>{{</dfn> | | Ally=<dfn>{{</dfn> | ||
|[[File:Sasha6-X.png|60px]] | |{{tt|[[File:Sasha6-X.png|60px]]|[[File:Mob - Water Priestess Sasha.png|150px]]}} | ||
|'''[[Sasha|Water Priestess Sasha]]''' - When you start this dungeon, there will be an NPC named Sasha. She will follow the El Search Party and tell you what the Temple of Trials is. | |'''[[Sasha|Water Priestess Sasha]]''' - When you start this dungeon, there will be an NPC named Sasha. She will follow the El Search Party and tell you what the Temple of Trials is. | ||
| | | | ||
| Line 26: | Line 26: | ||
| Mob=<dfn>{{</dfn> | | Mob=<dfn>{{</dfn> | ||
*All mobs except Ancient Magmanta can activate stoic after 30 hits. | *All mobs except Ancient Magmanta can activate stoic after 30 hits. | ||
|[[File:BrutalWalkerHead.png|60px]] | |{{tt|[[File:BrutalWalkerHead.png|60px]]|[[File:Mob - Brutal Walker.png|150px]]}} | ||
|'''Brutal Walker''' - Same as '''Shadow Port Walker''' but will be in super armor during first and last hit. | |'''Brutal Walker''' - Same as '''Shadow Port Walker''' but will be in super armor during first and last hit. | ||
| | | | ||
*'''Claw Attack:''' A basic 3 hit combo with their claws. | *'''Claw Attack:''' A basic 3 hit combo with their claws. | ||
|- | |- | ||
|[[File:BrutalDefenderHead.png|60px]] | |{{tt|[[File:BrutalDefenderHead.png|60px]]|[[File:Mob - Brutal Defender.png|200px]]}} | ||
|'''Brutal Defender''' - An enhanced version of '''Shadow Port Defender'''. | |'''Brutal Defender''' - An enhanced version of '''Shadow Port Defender'''. | ||
| | | | ||
| Line 37: | Line 37: | ||
*'''Dark Aura:''' Emit a dark aura that gives enemies within range super armor. | *'''Dark Aura:''' Emit a dark aura that gives enemies within range super armor. | ||
|- | |- | ||
|[[File:BrutalChargerHead.png|60px]] | |{{tt|[[File:BrutalChargerHead.png|60px]]|[[File:Mob - Brutal Charger.png|200px]]}} | ||
|'''Brutal Charger''' - Same as '''Shadow Port Charger'''. | |'''Brutal Charger''' - Same as '''Shadow Port Charger'''. | ||
| | | | ||
| Line 43: | Line 43: | ||
*'''Grab:''' It can also grab onto any players, immobilizing them. You can escape from their grasp by rapidly tapping the left and right arrow keys. | *'''Grab:''' It can also grab onto any players, immobilizing them. You can escape from their grasp by rapidly tapping the left and right arrow keys. | ||
|- | |- | ||
|[[File: | |{{tt|[[File:TwinkyLinkerHead.png|60px]]|[[File:Mob - Twinky Linker.png|150px]]}} | ||
|[[File: | |||
|'''Twinky Linker''' - Same as '''Shadow Linker''' but instead will using Soul Link this mobs now can use Lightning. | |'''Twinky Linker''' - Same as '''Shadow Linker''' but instead will using Soul Link this mobs now can use Lightning. | ||
| | | | ||
| Line 61: | Line 49: | ||
<dfn>}}</dfn> | <dfn>}}</dfn> | ||
| General=<dfn>{{</dfn> | | General=<dfn>{{</dfn> | ||
|[[File: | |{{tt|[[File:ColdheartedBrutalStingerHead.png|60px]]|[[File:Mob - Cold-hearted Brutal Stinger.png|200px]]}} | ||
| | |||
|'''Cold-hearted Brutal Stinger''' - A powerful '''Brutal Stinger''' that is stronger and has substantially more health. | |'''Cold-hearted Brutal Stinger''' - A powerful '''Brutal Stinger''' that is stronger and has substantially more health. | ||
| | | | ||
| Line 78: | Line 59: | ||
*Has a stoic threshold of 30 hits. | *Has a stoic threshold of 30 hits. | ||
|- | |- | ||
|[[File:ColdheartedBrutalCharger_Face.png|60px]] | |{{tt|[[File:ColdheartedBrutalCharger_Face.png|60px]]|[[File:Mob - Cold-hearted Brutal Charger.png|200px]]}} | ||
|'''Cold-hearted Brutal Charger''' - A powerful '''Brutal Charger''' that is stronger and has substantially more health. | |'''Cold-hearted Brutal Charger''' - A powerful '''Brutal Charger''' that is stronger and has substantially more health. | ||
| | | | ||
| Line 84: | Line 65: | ||
*'''Charge:''' It will run forward, damaging any players within its path. | *'''Charge:''' It will run forward, damaging any players within its path. | ||
*'''Grab:''' It can also grab onto any players, immobilizing them. You can escape from their grasp by rapidly tapping the left and right arrow keys. | *'''Grab:''' It can also grab onto any players, immobilizing them. You can escape from their grasp by rapidly tapping the left and right arrow keys. | ||
'''Notes:''' | '''Notes:''' | ||
*Has a stoic threshold of 30 hits. | *Has a stoic threshold of 30 hits. | ||
<dfn>}}</dfn> | <dfn>}}</dfn> | ||
| MiniBoss=<dfn>{{</dfn> | | MiniBoss=<dfn>{{</dfn> | ||
|[[File:ShadowPriestHead.png|60px]] | |{{tt|[[File:ShadowPriestHead.png|60px]]|[[File:Mob - Shadow Priest.png|200px]]}} | ||
|'''Shadow Priest | |'''Shadow Priest''' - A [[Resiam Outskirts|Shadow Master]] who's using its dark powers to restrain Helputt. | ||
| | | | ||
*'''Shadow Swipe:''' He will drag you towards him and then swipes at you. Throws you upwards for some distance. | *'''Shadow Swipe:''' He will drag you towards him and then swipes at you. Throws you upwards for some distance. | ||
| Line 107: | Line 79: | ||
*Does very low damage. | *Does very low damage. | ||
|- | |- | ||
|[[File:Corrupt_Destroyer_Helputt.png|60px]] | |{{tt|[[File:Corrupt_Destroyer_Helputt.png|60px]]|[[File:Mob - Fallen Guardian Helputt (Miniboss).png|300px]]}} | ||
|'''[[Helputt|Fallen Guardian: Helputt]]''' - [[Chung]]'s father, who is being controlled by the demons. His fighting stance and style is similar to that of [[Chung]]. He cannot be defeated and will finish you off with a near fatal attack. | |'''[[Helputt|Fallen Guardian: Helputt]]''' - [[Chung]]'s father, who is being controlled by the demons. His fighting stance and style is similar to that of [[Chung]]. He cannot be defeated and will finish you off with a near fatal attack. | ||
| | | | ||
| Line 125: | Line 97: | ||
| Obstacle= | | Obstacle= | ||
| Boss=<dfn>{{</dfn> | | Boss=<dfn>{{</dfn> | ||
|[[File: | |{{tt|[[File:Mob Icon - Fallen Guardian Helputt.png|60px]]|[[File:Mob - Fallen Guardian Helputt.png|300px]]}} | ||
|'''[[Helputt|Fallen Guardian: Helputt]]''' - Chung's father, who is being controlled by the demons. His fighting stance and style is similar to that of [[Chung]]'s. | |'''[[Helputt|Fallen Guardian: Helputt]]''' - Chung's father, who is being controlled by the demons. His fighting stance and style is similar to that of [[Chung]]'s. | ||
| | | | ||
| Line 148: | Line 120: | ||
*Helputt has no [[Stoic Thresholds|Stoic Threshold]], making it possible to keep him in an infinite stunlock using attacks with no KD value. | *Helputt has no [[Stoic Thresholds|Stoic Threshold]], making it possible to keep him in an infinite stunlock using attacks with no KD value. | ||
<dfn>}}</dfn> | <dfn>}}</dfn> | ||
| | | Reward=<dfn>{{</dfn> | ||
{| cellpadding="5" border="1" style="border-collapse: collapse;" width=100% | |||
|- | |||
! width="5%" | Image | |||
! width="15%" | Item Name | |||
! width="25%" | How to Obtain | |||
! width="55%" | Effect | |||
|- | |||
| [[File:HQ_Shop_Item_154066.png]] | |||
| Barrier's Fragment | |||
| Obtained by playing the dungeon. | |||
| Quantity: 100 | |||
Throw at [[A tree imbued with the El energy]] to gain rewards. | |||
|- | |||
| [[File:HQ_Shop_Item_154065.png]] | |||
| El Reward | |||
| Obtained by playing the dungeon. | |||
| Quantity: 5 | |||
Exchange for rewards at [[Ariel]]. | |||
|- | |||
| [[File:HQ Shop Item 127288.png]] | |||
| ED | |||
| Obtained by playing the dungeon. | |||
| ED Gain: 10,000,000 | |||
|- | |||
| [[File:HQ Shop Item 127043.png]] | |||
| EXP | |||
| Obtained by playing the dungeon. | |||
| EXP Gain: 200,000,000 | |||
|} | |||
<dfn>}}</dfn> | |||
|Dialogue= | |Dialogue= | ||
{{tabber | {{tabber | ||
| Line 273: | Line 266: | ||
*CP Requirement increased from 15000 to 1500000. | *CP Requirement increased from 15000 to 1500000. | ||
*Dungeon shortened. | *Dungeon shortened. | ||
|- | |||
| 14/03/2024 || 04/24/2024 || align="left" | | |||
*The miniboss appearance time is reduced. | |||
*A skip function for the boss ending cutscene is added. | |||
|} | |} | ||
<dfn>}}</dfn> | <dfn>}}</dfn> | ||
Latest revision as of 02:07, 30 August 2024


Temple of Trials
| “ | A hidden place surrounded by suspicion. We need to save the fallen White Colossus.
|
” |

Description
The shrine is at the end of Hamel, a hidden place unknown to anyone. Rumor has it, there lies the power of the Guardian Stone.
Recommended Level
99
Required Combat Power
1,500,000
Entry Requirements
{{
- 5 weekly entries permitted. Entry count is shared with other Secret Dungeons.
- Must be Level 99 or higher.
Ally
{{
{{
}}
| Ally Image | Ally Description | Ally Moves |
|---|---|---|
  |
Water Priestess Sasha - When you start this dungeon, there will be an NPC named Sasha. She will follow the El Search Party and tell you what the Temple of Trials is. |
}} |
Mobs
{{
{{
}}
- All mobs except Ancient Magmanta can activate stoic after 30 hits.
| Monster Image | Monster Description | Monster Moves |
|---|---|---|
  |
Brutal Walker - Same as Shadow Port Walker but will be in super armor during first and last hit. |
|
  |
Brutal Defender - An enhanced version of Shadow Port Defender. |
|
  |
Brutal Charger - Same as Shadow Port Charger. |
|
  |
Twinky Linker - Same as Shadow Linker but instead will using Soul Link this mobs now can use Lightning. |
}} |
General
{{
{{
}}
| Monster Image | General Description | General Moves |
|---|---|---|
  |
Cold-hearted Brutal Stinger - A powerful Brutal Stinger that is stronger and has substantially more health. |
Notes:
|
  |
Cold-hearted Brutal Charger - A powerful Brutal Charger that is stronger and has substantially more health. |
Notes:
}} |
Mini Boss
{{
{{
}}
| Monster Image | Boss Description | Boss Moves |
|---|---|---|
  |
Shadow Priest - A Shadow Master who's using its dark powers to restrain Helputt. |
Notes:
|
.png)  |
Fallen Guardian: Helputt - Chung's father, who is being controlled by the demons. His fighting stance and style is similar to that of Chung. He cannot be defeated and will finish you off with a near fatal attack. |
}} |
Boss
{{
{{
}}
| Monster Image | Boss Description | Boss Moves |
|---|---|---|
 |
Fallen Guardian: Helputt - Chung's father, who is being controlled by the demons. His fighting stance and style is similar to that of Chung's. |
Strategy:
}} |
Dialogue
- Dungeon Intro Dialogue
- Mid Dungeon Dialogue
- Mini Boss Dialogue
- Boss Intro Cutscene
- Boss Outro Cutscene
- Dungeon Victory Quote
 Sasha: This is the secret temple that Helputt was talking about...
Reward
{{
}}
| Image | Item Name | How to Obtain | Effect |
|---|---|---|---|

|
Barrier's Fragment | Obtained by playing the dungeon. | Quantity: 100
Throw at A tree imbued with the El energy to gain rewards. |

|
El Reward | Obtained by playing the dungeon. | Quantity: 5
Exchange for rewards at Ariel. |

|
ED | Obtained by playing the dungeon. | ED Gain: 10,000,000 |

|
EXP | Obtained by playing the dungeon. | EXP Gain: 200,000,000 |
Gallery
-
Old loading image.
-

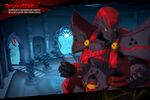
Helputt's corrupted form.
-

Helputt's true armor form after he has been purified from the demons.
-

Concept art of Helputt.
-

Concept art of the Strength Guardian.
-

Concept art of the Mind Guardian.
-
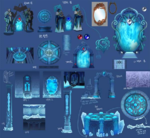
Concept art of the artifacts found in the temple.
-

Concepts art of the armors and weapon craft-able from Temple of Trials.


Trivia
{{
- There is a glitch where, if you awaken right before teleporting into Helputt's room, only your weapon (and tails if you're Ara) will appear, and you will be invincible against all attacks. However, you can still attack in this state.
- This state of invincibility and avatar invisibility will wear off once your awakening mode ends.
- Hamel Secret Dungeon Development Story. [1]
Updates
{{
}}
| Date | Changes | |
|---|---|---|
| KR | NA | |
| 11/09/2023 | 12/06/2023 |
|
| 14/03/2024 | 04/24/2024 |
|
Alternative Names
{{
}}
| Server | Name | Translation |
|---|---|---|
| 시련의 신전 | Temple of Trials | |
| 試煉神殿 | Temple of Trials | |
| 试炼之神殿 | Temple of Trials | |
| Tempel der Prüfungen | Temple of Tests | |
| Templo de las Pruebas | Temple of Trials | |
| Temple des épreuves | Temple of Tests | |
| Tempio delle Prove | Temple of Trials | |
| Świątynia Próby | Temple of Trials | |
| Temple of Testing | ||
| Templo das Provações | Temple of Trials | |
- Other
- Region 1~6
- Region 7~12
- Region 13~18
- Region 19~21
- Laby
- Noah
- Lithia
- Miscellaneous
| Event | Challenge Mode | Guild | ||
|---|---|---|---|---|
| {{ }} | {{ }} | {{ }} | {{ }} | {{ }} |
- Other
- Region 1~6
- Region 7~12
- Region 13~18
- Region 19~21