Temple of Trials: Difference between revisions
mNo edit summary |
m (Wasn't able to get all of Sasha's dialogue this time) |
||
| Line 230: | Line 230: | ||
|tab1=Dungeon Intro Dialogue | |tab1=Dungeon Intro Dialogue | ||
|contents1= | |contents1= | ||
{{*}}{{StoryIcon|Sasha}} '''Sasha''': '' | {{*}}{{StoryIcon|Sasha}} '''Sasha''': ''This is the secret temple that Helputt was talking about...'' | ||
|tab2=Mid Dungeon Dialogue | |tab2=Mid Dungeon Dialogue | ||
|contents2= | |contents2= | ||
{{*}}{{StoryIcon|Sasha}} '''Sasha''': ''불길한 기운이 느껴지고 있습니다. 어서 서둘러야 해요!!'' | {{*}}{{StoryIcon|Sasha}} '''Sasha''': ''불길한 기운이 느껴지고 있습니다. 어서 서둘러야 해요!!'' | ||
{{*}}{{StoryIcon|Sasha}} '''Sasha''': '' | {{*}}{{StoryIcon|Sasha}} '''Sasha''': ''Helputt's aura can be sensed....We must hurry!!'' | ||
{{*}}{{StoryIcon|Sasha}} '''Sasha''': '' | {{*}}{{StoryIcon|Sasha}} '''Sasha''': ''I have a bad feeling about this!'' | ||
---- | |||
Escape from Helputt: | |||
{{*}}{{StoryIcon|Sasha}} '''Sasha''': ''부디 신전의 시련을 이겨내시길...'' | |||
---- | |||
Defeat Guardian Knight of Trials: | |||
{{*}}{{StoryIcon|Sasha}} '''Sasha''': ''You have opened your eyes to a new power... But I need to practice my battle skills.'' | |||
---- | |||
Defeat Guardian Magician of Trials: | |||
{{*}}{{StoryIcon|Sasha}} '''Sasha''': ''I have a bad feeling about this....Let's hurry.'' | |||
|tab3=Mini Boss Stage Dialogue | |tab3=Mini Boss Stage Dialogue | ||
|contents3= | |contents3= | ||
{{*}}{{StoryIcon|Shadow Master2}} '''Shadow Priest''': '' | {{*}}{{StoryIcon|Shadow Master2}} '''Shadow Priest''': ''Sooner or later...<br>they will become our slaves forever...'' | ||
{{*}}{{StoryIcon|Shadow Master2}} '''Shadow Priest''': '' | {{*}}{{StoryIcon|Shadow Master2}} '''Shadow Priest''': ''May you fall deep into shadows of evil...'' | ||
{{*}}{{StoryIcon|Helputt2}} '''Helputt''': '' | {{*}}{{StoryIcon|Helputt2}} '''Helputt''': ''Ar...gh!...'' | ||
Defeat Shadow Priest: | Defeat Shadow Priest: | ||
{{*}}{{StoryIcon|Helputt2}} '''Helputt''': '' | {{*}}{{StoryIcon|Helputt2}} '''Helputt''': ''Ah....Don't you dare come any closer!!'' | ||
Helputt uses '''Death Howling''': | Helputt uses '''Death Howling''': | ||
{{*}}{{StoryIcon|Helputt2}} '''Helputt''': '' | {{*}}{{StoryIcon|Helputt2}} '''Helputt''': ''How dare you weeklings challenge demons!!'' | ||
{{*}}{{StoryIcon|Sasha}} '''Sasha''': '' | {{*}}{{StoryIcon|Sasha}} '''Sasha''': ''Self-improvement requires discipline. I need more time to improve. I'll have to retreat for now.'' | ||
{{*}}{{StoryIcon|Helputt2}} '''Helputt''': '' | {{*}}{{StoryIcon|Helputt2}} '''Helputt''': ''This is it. I will exterminate you!!'' | ||
|tab4 | |tab4=Boss Intro Cutscene | ||
|contents4={{*}}{{StoryIcon|Helputt2}} '''Helputt''': ''Surrender to the demons!!'' | |||
|tab5=Ending Dialogue | |||
|contents5={{*}}{{StoryIcon|Helputt}} '''Helputt''': ''I'll be fine. Leave Now!!<br> Be strong, my son...'' | |||
|tab6=Dungeon Victory Quotes | |||
|contents6= | |||
| | |||
| | |||
| | |||
| | |||
| | |||
{{CharsTabs | {{CharsTabs | ||
|EL= | |EL= | ||
| Line 290: | Line 292: | ||
*'''Ara''': ''-'' | *'''Ara''': ''-'' | ||
|ES= | |ES= | ||
*'''Elesis''': '' | *'''Elesis''': ''As expected of Hamel's White Colossus... Sir Helputt, we will never forget your assistance here.'' | ||
*'''Elesis''': '' | *'''Elesis''': ''I'm sorry, Chung. I'm sure no words can comfort you at this moment... But I'm sure we'll save Sir Helputt one day.<br>I will make sure that happens!'' | ||
*'''Elesis''': '' | *'''Elesis''': ''Even demon schemes were not able to crush Sir Helputt's indominable will...'' | ||
|AD= | |AD= | ||
*'''Add''': ''-'' | *'''Add''': ''-'' | ||
Revision as of 06:24, 27 February 2022


Temple of Trials
| “ | A hidden place surrounded by suspicion. We need to save the fallen White Colossus.
|
” |

- 1 free daily entry permitted.
- Have 1 Secret Dungeon Entry Permit
 in your inventory.
 - Must be Level 70 or higher.

| Ally Image | Ally Description | Ally Moves |
|---|---|---|

|
Water Priestess Sasha - When you start this dungeon, there will be an NPC named Sasha. She will follow the El Search Party and tell you what the Temple of Trials is. |
|
- All mobs except Ancient Magmanta now can activate stoic after 30 hits.
| Monster Image | Monster Description | Monster Moves |
|---|---|---|

|
Brutal Walker - Same as Shadow Port Walker but will super armor during first and last hit. |
|

|
Brutal Defender - An enhanced version of Shadow Port Defender. |
|

|
Brutal Charger - Same as Shadow Port Charger. |
|

|
Brutal Voider - Same as Shadow Port Voider. Can absorb magical projectiles and use their energy to heal themselves 10% of their maximum HP. |
|

|
Brutal Trickster - Same as Shadow Port Trickster. |
|

|
Twinky Linker - Same as Shadow Linker but instead will using Soul Link this mobs now can use Lightning. |
|

|
Ancient Magmanta - A small version of Magmanta. |
|
| Monster Image | General Description | General Moves |
|---|---|---|

|
Cold-hearted Brutal Walker - A powerful Brutal Walker that is stronger and has substantially more health. |
Notes:
|

|
Cold-hearted Brutal Stinger - A powerful Brutal Stinger that is stronger and has substantially more health. |
Notes:
|

|
Cold-hearted Brutal Charger - A powerful Brutal Charger that is stronger and has substantially more health. |
Notes:
|

|
Cold-hearted Brutal Defender - A powerful Brutal Defender that is stronger and has substantially more health. |
Notes:
|

|
Cold-hearted Brutal Trickster - A powerful Brutal Trickster that is stronger and has substantially more health. |
Notes:
|

|
Cold-hearted Brutal Bobosse - A powerful Brutal Bobosse that is stronger and has substantially more health. |
Notes:
|

|
Brutal Victor - Same as Victor, you will face during the Trial of Strength. |
|
| Monster Image | Boss Description | Boss Moves |
|---|---|---|

|
Shadow Priest (2x) - A Shadow Master who's using its dark powers to restrain Helputt. |
Notes:
|

|
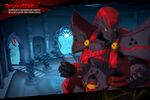
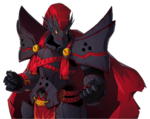
Fallen Guardian: Helputt - Chung's father, who is being controlled by the demons. His fighting stance and style is similar to that of Chung. He cannot be defeated and will finish you off with a near fatal attack. |
|

|
Guardian Knight of Trials - Miniboss required to defeat to pass the Trial of Strength and receive the Impenetrable Shield. |
Note:
|

|
Guardian Magician of Trials - Mini boss required to defeat to pass the Trial of Mind and receive the Magical Cape. |
Note:
|
| Obstacles Image | Obstacles Description |
|---|---|

|
Guardian Knight of Trials: Will knock you up by striking its hammer into the ground. |

|
Guardian Magician of Trials: Will knock you up and its magic can hit twice.
|
| Monster Image | Boss Description | Boss Moves |
|---|---|---|
|
|
Fallen Guardian: Helputt - Chung's father, who is being controlled by the demons. His fighting stance and style is similar to that of Chung. |
Strategy:
|
- Dungeon Intro Dialogue
- Mid Dungeon Dialogue
- Mini Boss Stage Dialogue
- Boss Intro Cutscene
- Ending Dialogue
- Dungeon Victory Quotes
 Sasha: This is the secret temple that Helputt was talking about...
- Ancient Antique Guardian
- (Old) Ancient Noble Guardian
- (Old) Ancient Royal Guardian
- (Old) Ancient Guardian
| Icon | Name | Stats | Set Bonus |
|---|---|---|---|
 |
Ancient Antique Guardian Top Piece | Lv. 80 Top Piece: [Unidentified * ?] |
2-Piece Effect:
3-Piece Effect:
4-Piece Effect:
|
 |
Ancient Antique Guardian Bottom Piece | Lv. 80 Bottom Piece: [Unidentified * ?] | |
 |
Ancient Antique Guardian Gloves | Lv. 80 Gloves: [Unidentified * ?] | |
 |
Ancient Antique Guardian Shoes | Lv. 80 Shoes: [Unidentified * ?] | |
 |
Ancient Antique Guardian Wings | Lv. 80 Accessory (Bottom Piece): [Unidentified * ?] |
3-Piece Effect:
|
 |
Ancient Antique Guardian Weapon | Lv. 80 Weapon: [Unidentified * ?] |


-
Old loading image.
-
Helputt's corrupted form.
-

Helputt's true armor form after he has been purified from the demons.
-
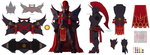
Concept art of Helputt.
-
Concept art of the Strength Guardian.
-

Concept art of the Mind Guardian.
-
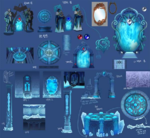
Concept art of the artifacts found in the temple.
-
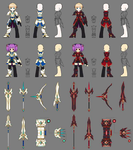
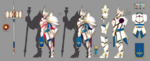
Concepts art of the armors and weapon craft-able from Temple of Trials.


- There is a glitch where, if you awaken right before teleporting into Helputt's room, only your weapon (and tails if you're Ara) will appear, and you will be invincible against all attacks. However, you can still attack in this state.
- This state of invincibility and avatar invisibility will wear off once your awakening mode ends.
- Hamel Secret Dungeon Development Story. [1]
| Server | Name | Translation |
|---|---|---|
| 시련의 신전 | Temple of Trials | |
| 試煉神殿 | Temple of Trials | |
| 试炼之神殿 | Temple of Trials | |
| Tempel der Prüfungen | Temple of Tests | |
| Templo de las Pruebas | Temple of Trials | |
| Temple des épreuves | Temple of Tests | |
| Tempio delle Prove | Temple of Trials | |
| Świątynia Próby | Temple of Trials | |
| Temple of Testing | ||
| Templo das Provações | Temple of Trials | |
- Other
- Region 1~6
- Region 7~12
- Region 13~18
- Region 19~21
- Laby
- Noah
- Lithia
- Miscellaneous
| Event | Challenge Mode | Guild | ||
|---|---|---|---|---|
| {{ }} | {{ }} | {{ }} | {{ }} | {{ }} |
- Other
- Region 1~6
- Region 7~12
- Region 13~18
- Region 19~21